Guide to bespoke furniture finishes for your entryway
TL;DR:
- A bespoke finish requires careful coordination of surface preparation, color application, sealing, and topcoats to ensure durability and aesthetic consistency. Skipping or rushing any stage leads to issues like blotchy color, poor adhesion, or peeling, especially in high-traffic entryway furniture. Proper technique, patience, and process control are essential to achieving long-lasting, professional results that maintain their beauty over years.
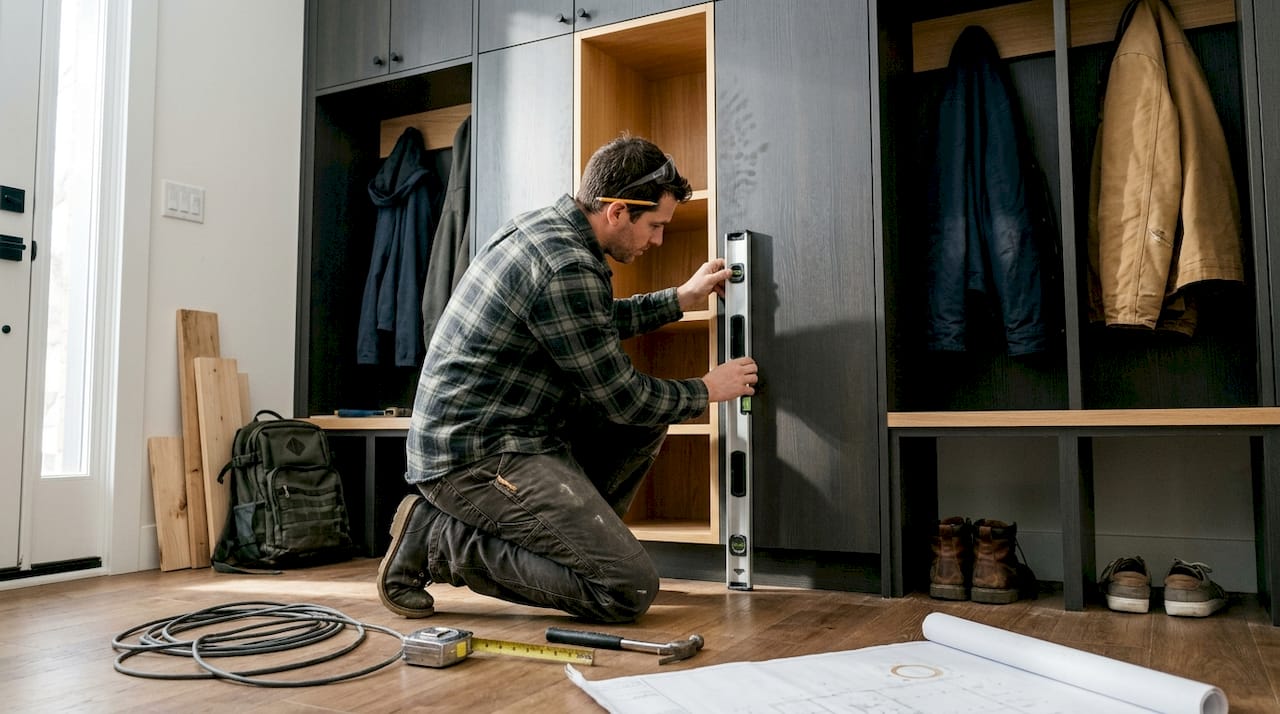
Picture this: a stunning custom entryway bench arrives at your Maryland home. The joinery is flawless, the wood grain is rich, and it looks like it belongs in a showroom. Six months later, the finish is streaking, the color has gone patchy, and the edges feel rough to the touch. The bench didn’t fail because of bad wood or poor construction. It failed because finishing was treated as an afterthought. This guide walks you through exactly what a bespoke finish is, why every single stage matters, and how to achieve a result that actually endures and impresses for years.
Table of Contents
- Understanding bespoke finishes: More than just a topcoat
- What you need: Tools and materials for a flawless finish
- Step-by-step: Crafting your bespoke entryway finish
- Troubleshooting and advanced techniques for entryways
- Verifying your results: What “success” looks like
- Expert perspective: Why finish process matters more than product
- Elevate your Maryland entryway with custom craftsmanship
- Frequently asked questions
Key Takeaways
| Point | Details |
|---|---|
| Finish is a system | Great results depend on coordinated steps—prep, stain, seal, and topcoat all matter. |
| Proper tools and timing | Investing in the right materials and dry times prevents defects and boosts durability. |
| Troubleshoot for perfection | Understanding and resolving common finish challenges leads to resilient, beautiful entryway furniture. |
| Process beats products | Skillful execution outperforms product selection alone for truly bespoke results. |
Understanding bespoke finishes: More than just a topcoat
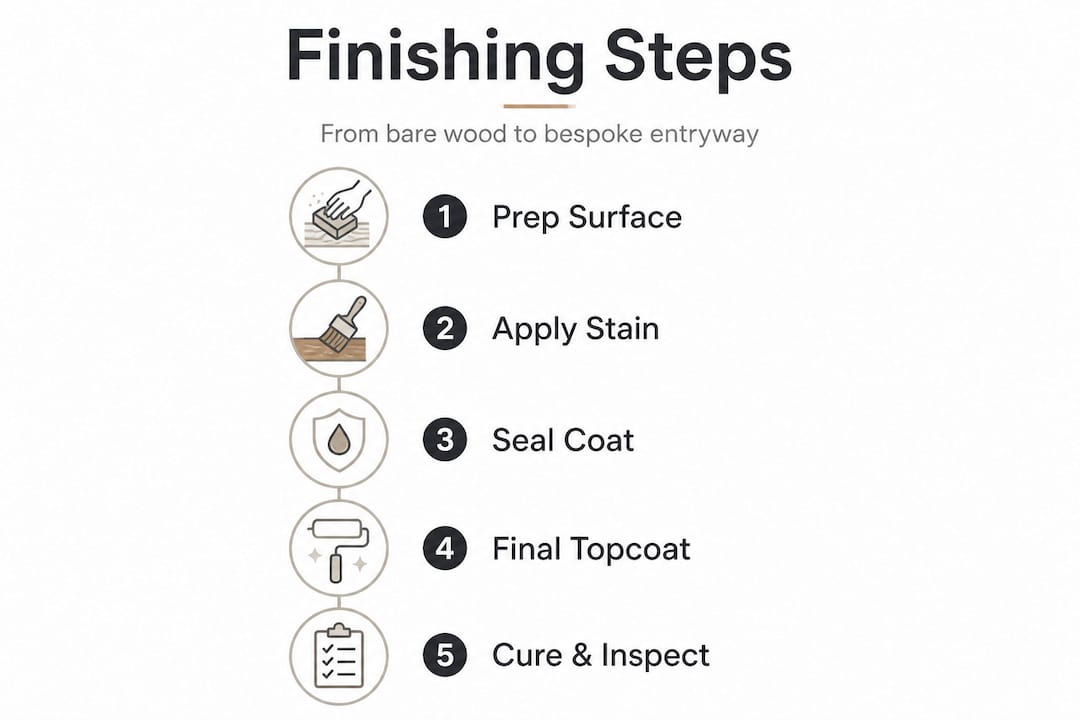
When most people think about furniture finishing, they picture the final coat of varnish or the last brush stroke. That narrow view is exactly what causes beautiful custom pieces to disappoint. A bespoke finish is not one product. It is a carefully coordinated system built across multiple stages, each one dependent on the one before it.
Bespoke finishing is a system where surface preparation, color and stain strategy, sealing, and topcoats all work together to determine how a piece looks and how long it lasts. Skip or rush any stage, and the problems compound. You end up with blotchy color, poor adhesion, or a topcoat that peels within a season.
Getting the sequence right starts with understanding what each stage actually does:
- Surface preparation: Opens the wood grain, removes mill marks and scratches, and creates a surface that finishes can bond to properly.
- Color or stain application: Introduces the tone and character you want, but only holds consistently when the surface prep is even.
- Sealing: Controls tannin bleed, locks in color, and creates a barrier between the raw wood and the topcoat.
- Topcoat: Provides the final protection layer and visual sheen, but its durability depends entirely on what sits beneath it.
Understanding surface preparation steps is where real expertise begins. Many DIY finishers jump to the fun parts and pay for it later.
Here is a quick look at how a bespoke process compares to a standard off-the-shelf approach:
| Stage | Bespoke approach | Standard approach |
|---|---|---|
| Surface prep | Progressive sanding, grain management | Quick sand or skip |
| Color strategy | Test patch, custom stain mixing | Pre-mixed can |
| Sealing | Dedicated tannin-blocking sealer | Often skipped |
| Topcoat | Thin layers, sanded between coats | One heavy coat |
| Result | Consistent, durable, personal | Uneven, prone to failure |
The difference shows. Not just on the first day, but five years later when a bespoke entryway bench still looks intentional and alive.
What you need: Tools and materials for a flawless finish
Knowing the stages is one thing. Showing up with the right tools is what separates a frustrating afternoon from a satisfying result. For entryway furniture, which takes daily wear and tear from shoes, bags, and changing seasons, there is no room for improvising.
Here is what you genuinely need before starting any finishing project:
- Sanding blocks and paper in multiple grits (start around 80 or 100 grit, finish at 180 to 220 grit for furniture)
- Tack cloths to capture fine dust between stages
- A dedicated stain or dye matched to your wood species and design vision
- A tannin-blocking sealer (especially critical for woods like white oak or cherry)
- Topcoat product suited to your use case: polyurethane, hardwax oil, or waterborne finish
- Quality brushes or applicator pads designed for the finish type you are using
- Temperature and humidity monitor so you can time your coats correctly
Professional-grade finishing technique relies heavily on controlling the sanding sequence, dust removal, and re-coat timing. These three factors prevent the most common visible defects: dust nibs embedded in the finish, grain raise that turns a smooth surface sandpaper-rough, and blotchy color that cannot be fixed after the fact. One of the most important details for water-based finishes is to raise the grain intentionally with a damp cloth, let it dry completely, then re-sand before applying the first coat. Most people skip this step. They pay for it later.
Pro Tip: If your entryway sees heavy use from kids or pets, bump up to a commercial-grade polyurethane topcoat with at least three coats, sanding lightly between each. The difference in durability over two to three years is significant.
When creating custom pieces like mud lockers or built-in benches, the complexity of the finish often increases because you are working around edges, inside panels, and in tight corners. Having the right applicator for each zone is not a luxury. It is a practical necessity.
Step-by-step: Crafting your bespoke entryway finish
With your materials ready, here is the process that delivers consistent, professional results on custom entryway furniture.
-
Sand progressively through the grits. Start at 80 or 100 grit to remove any mill marks or rough spots. Move to 120, then 150, then finish at 180 to 220 grit. Never skip a grit. Jumping too fast leaves scratches that show clearly under stain.
-
Raise the grain (for water-based finishes). Wipe the surface with a barely damp cloth and let it dry fully. Sand lightly with 220 grit. This prevents the first wet coat from lifting fibers and creating a rough texture.
-
Remove all dust. Vacuum thoroughly, then wipe with a tack cloth. Even a small dust particle trapped under a finish coat will create a visible nib. In a high-gloss finish, those nibs catch light and stand out immediately.
-
Test your stain or color in an inconspicuous area. The back of a panel, the underside of a shelf. Every wood responds differently to stain, and every batch of wood has variations. Testing is not optional if you care about consistency.
-
Apply color evenly, working with the grain. Wipe off excess before it tacks up. Overlapping wet areas causes darker spots. Keep a consistent rhythm across the whole surface.
-
Apply the sealer coat. This step is especially important for tannin-rich woods and open-grain species. The sealer locks in the color and prevents bleeding into the topcoat.
-
Apply topcoat in thin layers. Thin coats bond better, dry faster, and are far less likely to sag or run. Sand lightly between coats with 320 grit paper or a fine abrasive pad. Wipe clean before the next coat.
-
Allow full cure time before use. Dry time and cure time are different. A surface may feel dry in hours but not reach full hardness for several days or weeks. Using a piece before it cures fully will leave marks and impressions.
“Surface preparation and dry and cure timing dominate defect risk more than the specific product you choose.” Wood Finishing: Preparation to Perfection
For furniture project inspiration that shows what a well-executed finish looks like in real Maryland homes, it helps to see finished examples before committing to your own color and sheen direction.
Pro Tip: Between topcoat layers, sand in the direction of the grain only. Cross-grain sanding scratches will telegraph through the next coat and become visible in raking light.
Troubleshooting and advanced techniques for entryways
Even careful work runs into problems. Knowing what went wrong and how to fix it saves hours of frustration and protects your investment in a custom piece.
Common issues and how to handle them:
- Tannin pull or dark spotting: Usually caused by skipping the sealer step. Tannin-related spotting is corrected by thinking in systems: sealer, surface prep, and dry time working together rather than relying on any one product.
- Dust nibs: Sand lightly with 320 grit after the finish has fully dried, wipe clean, and recoat. Prevent them next time by working in a cleaner environment and never finishing on a windy day.
- Uneven color or blotching: Almost always a prep issue. The surface was not sanded evenly, or stain was applied over sections with different porosity. A pre-conditioner or wash coat before staining helps on porous woods like pine or alder.
- Sanding lines visible under finish: You skipped a grit in the progression. Sand back to the grit where the lines appear, and work through the sequence again properly.
For finishing advanced pieces like paneled mud lockers with inset doors, controlling the environment matters as much as technique.
Here is how the most common finish options stack up for entryway furniture specifically:
| Finish type | Durability | Repairability | Look | Best for |
|---|---|---|---|---|
| Oil-based polyurethane | Excellent | Moderate | Amber, warm | High-wear surfaces |
| Waterborne polyurethane | Very good | Moderate | Clear, cool | Light-colored woods |
| Hardwax oil | Good | Easy | Natural, matte | Low to medium wear |
| Penetrating oil | Fair | Very easy | Very natural | Feature pieces, low traffic |
For high-wear furniture, polyurethane is consistently recommended as the most durable film-building option. Key process controls include working in a dust-free area, keeping temperature between 60 and 80°F, keeping humidity below 50% if possible, thinning the first coat for better penetration, and sanding between every coat.
Understanding hardwood finish strategies gives you additional context for choosing between film-building and penetrating options based on your specific piece and lifestyle needs.
Verifying your results: What “success” looks like
Finishing is one of those disciplines where it is easy to convince yourself the work is done before it actually is. Here are the honest benchmarks to measure against.
Visual checks:
- Color is uniform across the entire surface, with no streaks, darker patches, or missed spots
- The sheen level is consistent (not glossy in one section and matte in another)
- No dust nibs, drips, or sag marks are visible in raking light
Tactile checks:
- Edges feel as smooth and sealed as the flat surfaces
- The surface feels smooth but not slippery, which indicates a proper topcoat film
- No rough patches where grain has raised under the finish
Performance check:
- Place a few drops of water on the surface. They should bead up and not soak in. If they spread and absorb, your topcoat is either too thin or not fully cured.
Choosing between protection and aesthetics:
Some guides emphasize maximum protection through film-building topcoats, while others recommend penetrating oils when repairability and a natural hand-feel matter most. Neither is universally right. The correct answer depends on your specific entryway, how much traffic it handles, and how much maintenance you are willing to do over time. A high-gloss polyurethane on a family mud locker is a practical, defensible choice. A hardwax oil on a decorative accent bench in a low-traffic foyer is equally valid.
| Priority | Recommended finish | Tradeoff |
|---|---|---|
| Maximum durability | Oil-based polyurethane | Slower dry time, amber tone |
| Easy touch-up | Hardwax oil or penetrating oil | More frequent maintenance |
| Clearest color | Waterborne polyurethane | Slightly less warm tone |
| Natural feel | Penetrating oil | Less surface protection |
Expert perspective: Why finish process matters more than product
After more than 20 years building custom entryway furniture in Maryland, here is something we have noticed over and over: most finishing failures are not product failures. They are process failures. Homeowners and even experienced designers spend time researching which brand of polyurethane to buy, when the real question is whether they prepped the surface correctly, controlled the environment, and gave each stage enough time.
Maryland’s climate makes this especially relevant. Humidity here can swing dramatically between seasons, and those changes affect how finishes cure and how wood moves. A coat applied in a garage on a humid August afternoon will behave differently than the same product applied in a climate-controlled shop in January. Process controls dominate outcomes far more than brand choice.
The other thing worth saying directly: bespoke finishing takes time. Real time. You cannot rush the sanding, skip the test patch, or cut cure time short and expect a result you will still be proud of in three years. The word “bespoke” implies patience and intention. That same patience has to carry through to the finishing stage, not just the joinery.
When clients visit our showroom and ask what makes our pieces look the way they do, the answer is never a product name. It is the willingness to follow our furniture process with discipline, correct mistakes early, and treat finishing as craft rather than cleanup.
Elevate your Maryland entryway with custom craftsmanship
Now that you understand what bespoke finishing really involves, you can see why the results differ so dramatically from off-the-shelf furniture. Every stage, from the first sanding grit to the final cured topcoat, shapes the piece you live with every day.

If you are ready to move from theory to a finished piece you will love, we are here to help. At Furniture Design Group, we have spent over 20 years refining exactly the process you just read about. Whether you want to explore what is possible through our custom furniture process or browse real Maryland homes in our inspiring project gallery, the next step is just a conversation. Reach out for a consultation and let’s talk about what your entryway could become.
Frequently asked questions
What is the difference between bespoke and standard furniture finishes?
Bespoke finishes are tailored, multi-stage systems designed around each specific piece and wood species, while standard finishes typically apply a single product without adjusting for grain, tannins, or use conditions.
How long should I wait between coats during finishing?
Always follow the product’s specific dry time, but most quality finishing steps require several hours to overnight between coats for proper adhesion and to avoid trapping solvents under the next layer.
What is the best finish for high-wear entryway furniture?
Polyurethane is the most durable film-building option for high-traffic entryway pieces, though penetrating oils are preferred by some for easier spot repair and a softer, more natural appearance.
How do I fix uneven color or blotching on my finished piece?
Prevent blotching through proper surface prep and a dedicated sealer before staining; if it has already occurred, lightly sand and reapply stain or sealant after addressing the underlying prep issue.