Installation Guide for Mud Lockers: DIY Steps That Work
TL;DR:
- A well-designed mud locker system relies on building a level ladder base to ensure stability and proper alignment.
- Dry-fitting components, shimming in pairs, and securing to studs with appropriate screws are crucial for a professional, durable finish.
- Proper planning and patience during installation lead to a level, stable, and lasting entryway storage solution customized to your space.
Every entryway tells a story, and most of them involve a pile of shoes, a tangle of backpacks, and coats draped over whatever is closest to the door. A solid installation guide for mud lockers is what transforms that chaos into a system that actually holds up. Mud lockers give every family member a dedicated spot for their gear, and the difference in daily life is immediate. This guide walks you through the full process, from measuring your space and building a ladder base to securing the unit to your wall and adding the finishing details that make it look like a professional built it.
Table of Contents
- Key takeaways
- Installation guide for mud lockers: tools and prep
- Building a solid base and framework
- Assembling dividers, frames, and doors
- Leveling, securing, and finishing
- What I learned building these things in real homes
- Get a mud locker built to your exact space
- FAQ
Key takeaways
| Point | Details |
|---|---|
| Plan before you cut | Dry-fitting your carcasses before final assembly prevents costly mistakes and reveals fit issues early. |
| Build a ladder base first | A 2x4 ladder base creates a level platform that compensates for uneven floors throughout the project. |
| Shim in pairs | Front-and-back shim pairs keep the unit stable and prevent cabinet twist over time. |
| Use the right screws | Cabinet screws (2.5 to 3 inches) hold far better than drywall screws under the weight of daily use. |
| Clamp before you fasten | Clamping adjacent face frames before screwing keeps everything flush and aligned for a professional finish. |
Installation guide for mud lockers: tools and prep
Getting your space and materials ready before you cut a single board is what separates a smooth project from one that stalls halfway through. Skipping prep is the single most common reason DIY cabinet projects go sideways.
What you need on hand
Gather these tools and materials before you start:
- Tape measure, pencil, and a long straightedge
- Laser level or a 4-foot spirit level
- Circular saw and miter saw
- Pocket hole jig and pocket screws
- Power drill and driver bits
- Cabinet installation screws (2.5 to 3 inches)
- Shims (wood or composite)
- 3/4-inch plywood and 2x4 lumber
- Wood glue and clamps
- Stud finder and wall anchors
Pro Tip: Buy 10 to 15 percent more plywood than your cut list calls for. Mistakes happen, and running back to the lumber yard mid-project costs you hours.
Measuring and planning your layout
Measure the full width of your entryway wall and mark the height you want the lockers to reach. Sketch your layout on paper, assigning a specific width to each locker bay. Standard individual locker bays run between 15 and 20 inches wide, but your space dictates the final numbers. Check the wall for outlets, switches, and baseboard heating that need to be worked around.
A practical interior design guide can help you think through the proportions of your space before committing to a layout. Remove all baseboards from the installation area and check the floor and walls with your level. Mark stud locations across the entire run of the planned installation. Note any low spots or high spots on the floor, since these will determine how you set your ladder base.
A standard mudroom installation takes between 5 and 10 days depending on complexity, so plan your timeline before you buy materials.
Building a solid base and framework
The foundation of your mud locker system is what everything else rests on. Get this wrong and you will fight alignment problems for the rest of the build.
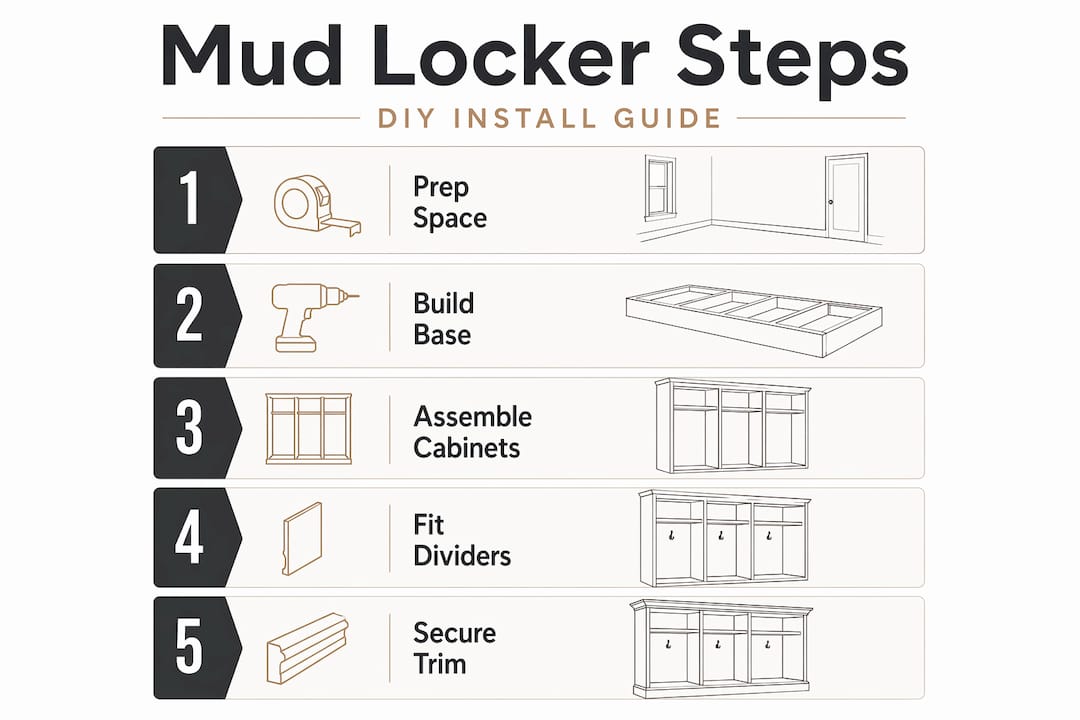
Constructing the ladder base
Never rest plywood carcasses directly on the subfloor. The floor is almost never flat, and even small variations will twist your cabinets. Instead, build a 2x4 ladder base that spans the full footprint of your locker run.
Here is how to build it:
- Cut two 2x4 rails to the full length of your locker run.
- Cut cross members to match the depth of your cabinet boxes, typically 16 inches.
- Space the cross members every 16 to 24 inches across the length of the rails.
- Fasten the ladder together with construction screws at every joint.
- Set the assembled ladder base in position along your wall.
- Find the highest point on your floor, then use a laser level to project a reference line across the full run.
- Shim the ladder base at low points until the top surface is perfectly level along that reference line.
- Fasten the base to the floor with appropriate fasteners at the stud locations.
Pro Tip: Once the ladder base is level, mark the shim positions with a pencil and pull the base away temporarily. Apply a bead of construction adhesive under each shim location, then reset and fasten. The adhesive keeps shims from creeping over time.
Building the base cabinet carcasses
Cut your plywood panels according to your cut list. Use a pocket hole jig to join the top, bottom, and side panels of each cabinet box. The pocket hole method gives you fast, strong joints that hold up to the weight of coats, boots, and bags.
Dry-fit every carcass in position before driving a single permanent screw. This is the step most DIYers skip, and it is the step that catches every wall irregularity, tight corner, and plumb issue before it becomes a problem. Adjust as needed, then commit to final assembly.
Assembling dividers, frames, and doors
With your base in place and your cabinet boxes built, you move into the middle phase of the mud lockers assembly guide: getting the compartments to look and function like a unified piece of furniture.
Setting vertical dividers
Cut your vertical divider panels to the exact interior height between your base platform and the upper shelf. This is where spacer blocks cut to the exact interior locker width become invaluable. Drop a spacer block into the base, set your divider panel against it, and you have perfect spacing without measuring the gap repeatedly. Fasten each divider through the top and bottom panels using pocket screws.
Installing upper bulkheads and shelves
- Measure and cut the upper shelf or bulkhead panel to span the full width of the locker run.
- Fasten it to the top of the vertical dividers with pocket screws.
- If you are building a two-tier design with an upper cabinet section, repeat the carcass assembly process for the upper boxes.
- Set the upper boxes on top of the lower boxes and join them with screws driven through the side panels.
- Check for plumb front to back and side to side at each stage. Adjust shims under the base if needed.
Pro Tip: Cut a piece of 1/4-inch plywood as a back panel for each upper cabinet. Nailing it in square forces the entire box into square, even if your pocket screw joints were slightly off.
When installing custom furniture pieces in entryways, the back panel trick is one of the most reliable ways to keep everything true without specialized jigs.
Building and attaching the face frame
The face frame is the piece that makes the project look like furniture instead of a box. Cut your face frame stiles and rails from solid wood. Assemble the frame with pocket hole joinery on a flat surface. Once the glue is dry, position the frame flush with the front edges of your cabinet boxes and fasten it with finish nails and glue.
For inset doors, maintain a consistent 1/8-inch reveal gap on all four sides of each door panel. This requires careful fitting and sometimes light planing, but the result is the hallmark of quality built-in work.
- Sand face frame edges flush to the cabinet sides before fastening
- Use a pneumatic nailer to speed up face frame attachment
- Set door hinges before final paint or finish to check swing clearance
Leveling, securing, and finishing
This is the phase where your mud locker stops being an assembly and starts being a fixture.
Finding your level reference and shimming correctly
Find the highest point on the floor and use it as your zero reference. From there, every low point in the floor needs to be shimmed up to match. The goal is flatness within 1/8 inch over 10 feet across the entire base. Use a long straightedge to check this repeatedly as you work.
Shim in front-and-back pairs at every contact point between the ladder base and the floor. Single shims under one edge of a contact point create a pivot that will let the unit rock. Pairs stabilize the full depth. Pin or glue each pair before you drive the fastening screws so they cannot shift.
| Step | Action | Why it matters |
|---|---|---|
| Locate highest floor point | Scan floor with laser level | Sets the baseline for all shimming |
| Shim ladder base | Use front-and-back pairs | Prevents cabinet twist and rocking |
| Fasten to wall studs | Use 2.5 to 3-inch cabinet screws | Provides weight-bearing strength for heavy loads |
| Clamp adjacent boxes | Clamp face frames before screwing | Keeps faces flush and eliminates misalignment |
| Install toe kicks | Scribe and fit to floor contours | Covers shims and completes the built-in look |
Clamping adjacent cabinet face frames before driving screws is the step most homeowners learn about only after seeing a misaligned run. The clamp holds both faces at exactly the same plane while the screw pulls them together.
Fastening to the wall
Use cabinet installation screws rather than drywall screws. Drywall screws are brittle and will snap under lateral stress. Drive your cabinet screws through the back nailer rails of each cabinet box and into wall studs. Two screws per stud location, top and bottom rail, gives you a connection that will outlast the cabinet finish.
- Mark all stud locations on the wall before the cabinet boxes go up
- Drill clearance holes through the nailer to prevent splitting
- Countersink screw heads so they sit flush and do not interfere with shelving
Toe kicks, scribes, and trim
Cut toe kick material from scrap plywood or the solid wood you used for the face frame. Scribe the bottom edge to follow any floor variations so it sits tight without gaps. If the wall at either end of the run is out of plumb, cut a scribe filler strip and use a compass to trace the wall contour, then plane to the line. Finish with paint or stain to match the rest of the unit.
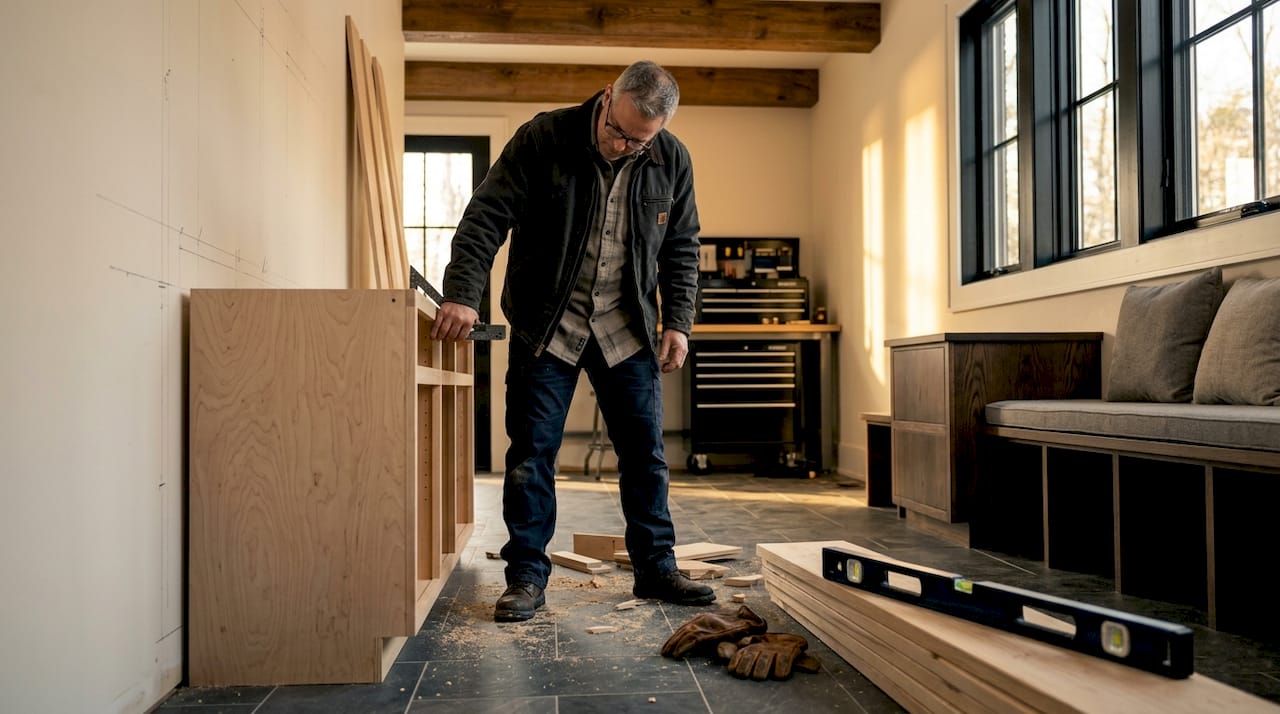
What I learned building these things in real homes
I have watched a lot of DIY mud locker projects succeed and fail, and the gap almost always comes down to the same two things: patience during planning and honesty about the floor.
Builders who dry-fit every component before final assembly rarely run into serious problems. Builders who skip it are always the ones calling me because their face frame is bowed or their doors will not close. The extra hour you spend dry-fitting saves you a full day of disassembly.
Shims are not a sign of failure. I have seen homeowners pull shims out because they felt like they were hiding a mistake. They were not. Shims are a structural element. Every professional cabinet installer I have ever worked alongside uses them without hesitation, because every floor and every wall has variation. The goal is not a perfect substrate. The goal is a level, stable result regardless of what the substrate does.
The best advice I can give you is to build the ladder base carefully, check level constantly, and keep your screws in studs. Everything else is just patience and repetition.
— Donovan
Get a mud locker built to your exact space

If you have measured your entryway and realized the space is too irregular, the ceiling is too low, or you simply want something that looks like it was always part of the house, Furnituredesigngroup has been solving exactly these problems for over 20 years. The team at Furnituredesigngroup specializes in custom mud locker designs sized and finished for your specific home. Browse the finished project gallery to see what a fully custom entryway system looks like, then reach out directly for a consultation. Every piece is built to last, not assembled from a box.
FAQ
What is the first step in a mud locker installation?
The first step is building a level 2x4 ladder base across the full footprint of the locker run. This platform compensates for uneven floors and gives your cabinet boxes a stable, flat foundation to sit on.
How long does it take to install mud lockers?
A basic mud locker installation typically takes around 5 days, while a fully custom built-in system can take 10 days or more depending on the complexity of the design and the condition of the space.
What screws should I use when installing mud lockers?
Use cabinet installation screws that are 2.5 to 3 inches long. Drywall screws are too brittle for cabinetry and can snap under the lateral load that mud lockers carry daily.
Why do I need to shim in front-and-back pairs?
Single shims create a pivot point that lets the cabinet rock. Front-and-back pairs support the full depth of the cabinet base and prevent any twisting or instability after the unit is fastened to the wall.
Can I install mud lockers on an uneven floor without a ladder base?
You can try, but the results will almost always disappoint. An uneven base causes the entire locker system to twist, which leads to doors that will not align and gaps that grow over time. A simple ladder base solves all of that before you build a single cabinet box.