Step-by-step guide: Build custom entryway furniture
TL;DR:
- Custom DIY entryway furniture offers tailored fit, materials, and design control.
- Proper planning, accurate measuring, and choosing suitable joinery ensure durable results.
- Patience and precision in building create lasting pieces that enhance home comfort.
You’ve measured the space three times, browsed every furniture store in Maryland, and still can’t find an entryway bench that actually fits. Too wide, too shallow, the wrong finish, or simply no storage where you need it most. That frustration is exactly why so many Maryland homeowners are turning to custom DIY builds. Building your own entryway furniture means you control every dimension, every material, and every detail. This guide walks you through planning, construction, joinery, and finishing so you can create a piece that looks like it was always meant to be there.
Table of Contents
- Essential planning and materials for custom entryway builds
- Step-by-step construction: From cut list to assembly
- Strengthening your build: Joinery options for durability
- Avoiding mistakes: Common pitfalls and troubleshooting tips
- Why bespoke craftsmanship is worth the extra effort
- Take your furniture projects to the next level
- Frequently asked questions
Key Takeaways
| Point | Details |
|---|---|
| Careful planning is essential | Successful furniture projects start with precise measurements, space checks, and a full tool list. |
| Choose the right joinery | Select beginner or advanced joints based on your skill and the expected load of your entryway piece. |
| Avoid common mistakes | Double-check layout, clamp properly, and use dry lumber to prevent failures and rework. |
| Local resources add value | Maryland classes and local guidance can help you master craftsmanship and avoid pitfalls. |
Essential planning and materials for custom entryway builds
Once you know why custom is the way to go, it’s time to gear up. Before you buy a single board or fire up a saw, spend time on paper. Sketch your entryway to scale. Note the ceiling height, door swing, wall width, and any baseboard molding that might interfere with your build. Measuring space twice and checking for square before you cut prevents costly do-overs that eat into your budget and motivation.
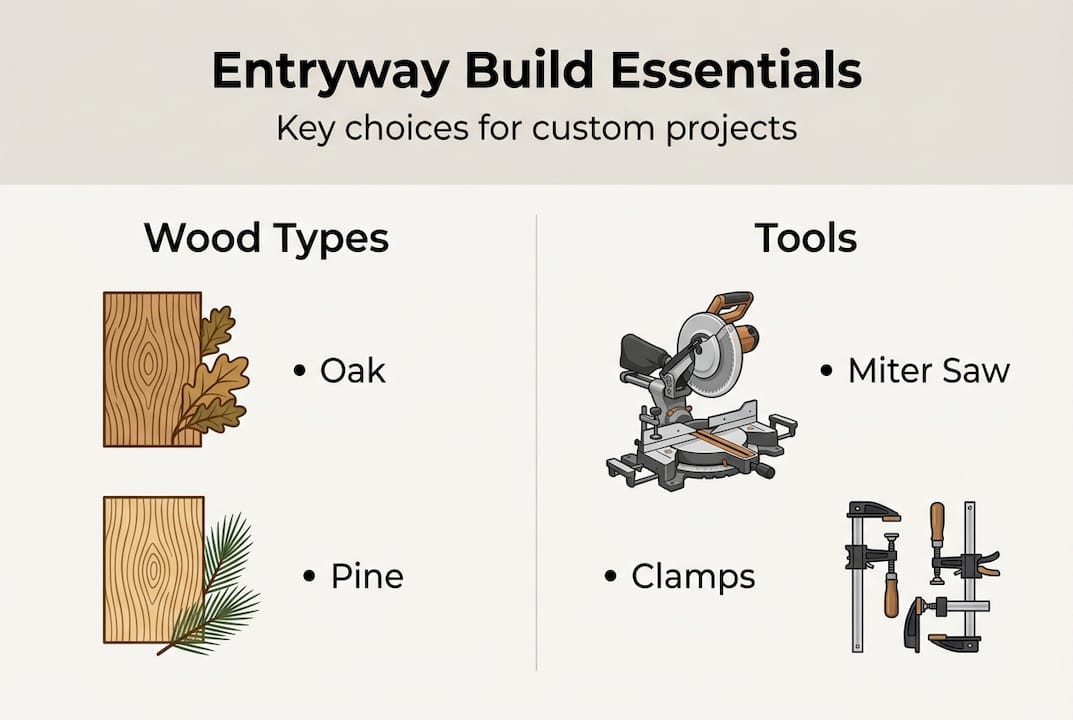
Choosing the right wood matters just as much as your measurements. For most entryway projects, you’ll work with three main materials. Plywood gives you stable, flat panels ideal for shelving and cabinet backs. Pine is affordable, easy to cut, and beginner-friendly, though it dents more easily. Oak is harder, heavier, and more expensive, but it holds up beautifully in high-traffic spots like entryways.
| Tool or material | Best used for | Skill level |
|---|---|---|
| Miter saw | Clean crosscuts on boards | Beginner |
| Pocket hole jig (Kreg) | Fast, strong face-frame joints | Beginner |
| Brad nailer | Attaching trim and backs | Beginner |
| Clamps (4-6 minimum) | Holding joints during glue-up | All levels |
| Orbital sander | Smooth finish prep | Beginner |
| Oak or pine lumber | Frame and panel construction | All levels |
| 3/4" plywood | Shelving, seat platforms | Beginner |
For joinery, beginners get the best results with pocket holes and brad nails. Pocket holes, drilled with a Kreg jig, pull two boards together at an angle using a self-tapping screw. They’re fast, reliable, and forgiving for first-time builders. Free entryway bench plans with full cut lists and materials from Ana White make it even easier to get started without guessing.
Pro Tip: Always purchase at least 10% more lumber than your cut list requires. Wood has knots, checks (small cracks), and grain issues that force you to cut around defects. That extra material is cheap insurance.
If you want inspiration for what durable custom furniture looks like when built with precision and care, studying finished examples before you start helps you visualize the final goal and stay motivated through the process.
- Measure and sketch your space before purchasing anything
- Choose wood species based on durability needs and budget
- Stock up on pocket hole screws, wood glue, and clamps
- Download a free cut list and review it fully before cutting
- Buy 10% extra material as a buffer for errors
Step-by-step construction: From cut list to assembly
Armed with plans and materials, you’re ready to bring your vision to life. The key to a clean build is working in order. Rushing ahead or skipping steps is where projects go wrong. Follow this sequence every time.
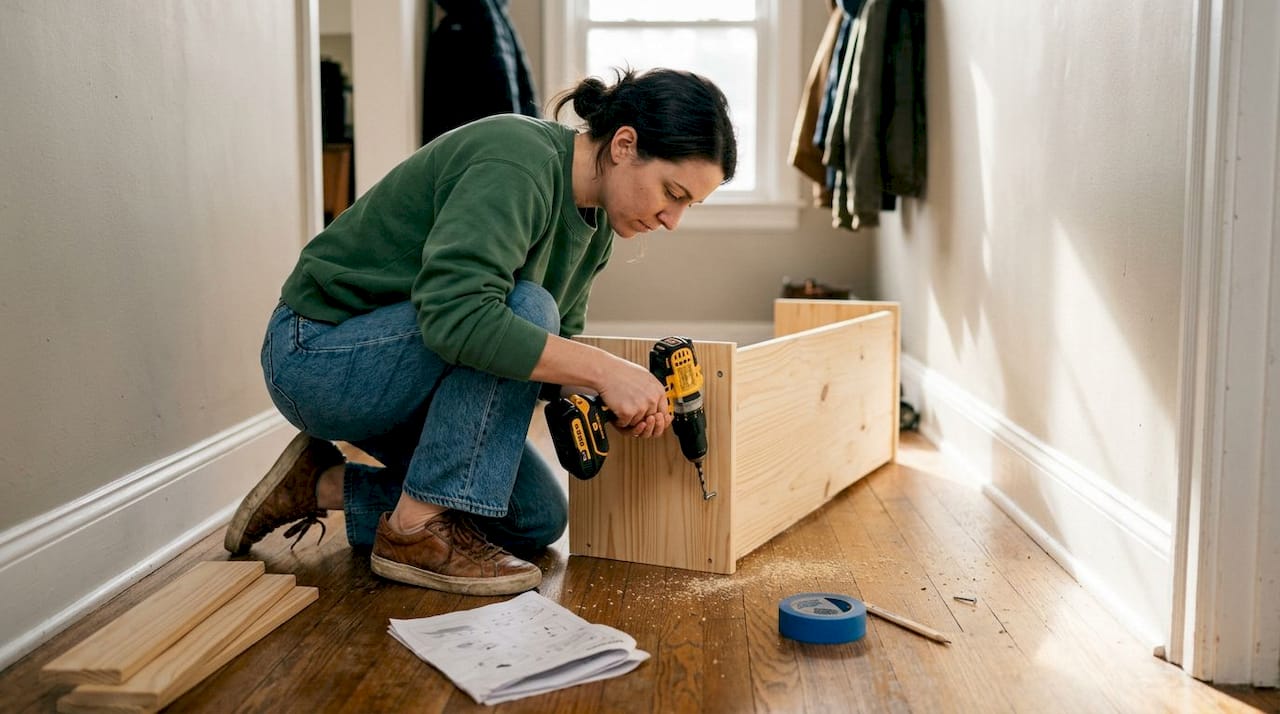
1. Review and mark your cut list. Read through your entire cut list before touching a saw. Mark each board with a pencil, noting which face will be visible. Label pieces with painter’s tape so you don’t mix them up.
2. Cut all pieces before assembling. Cut every part first rather than cutting and assembling as you go. This gives you a chance to dry-fit everything before glue is involved. Console tables use pocket holes and pine with brad nails to secure trim, a method that transfers perfectly to benches and hall trees too.
3. Dry-fit the entire piece. Clamp everything together without glue or screws. Look for gaps, twists, or misaligned joints. Fix problems now, not after the glue dries.
4. Assemble with glue and fasteners. Apply wood glue to joinery surfaces, then drive pocket screws or brad nails. Work from the inside out, attaching the frame first, then shelves, then trim.
5. Check for square at every stage. Measure corner to corner diagonally. Equal measurements mean a square frame. Unequal measurements mean you need to rack the frame slightly before the glue sets.
Pro Tip: Keep a framing square on your workbench and press it into every corner right after assembly. Catching a twist at this stage takes seconds. Fixing it after the glue cures can take hours.
| Stage | Common pitfall | Quick check |
|---|---|---|
| Planning | Skipping the cut list | Review list twice before cutting |
| Cutting | Measuring only once | Measure twice, mark clearly |
| Assembly | Rushing past dry-fit | Always dry-fit before gluing |
| Finishing | Sanding too little | Feel every surface by hand |
For custom features like drawers or open shelves, build the main carcass (the outer box) first, then fit the interior components. This approach, which experienced builders call masterpiece techniques, keeps the structure stable while you fine-tune the details.
Strengthening your build: Joinery options for durability
With your piece assembled, make it sturdy enough for everyday Maryland life. Entryways take a beating. Boots hit the bench, bags hang from hooks, kids yank on doors. The joinery holding your furniture together needs to match that reality.
| Joint type | Tools needed | Skill level | Strength rating |
|---|---|---|---|
| Pocket hole | Kreg jig, drill | Beginner | Good for frames |
| Brad nail + glue | Brad nailer | Beginner | Good for trim |
| Dado joint | Router or table saw | Intermediate | Excellent for shelves |
| Mortise and tenon | Chisels, mallet, drill | Advanced | Superior |
| Dovetail | Dovetail jig, router | Advanced | Superior |
For most DIY entryway builds, pocket holes are completely sufficient. They handle the weight of a seat, the stress of shelving, and the daily use of hooks and hangers without complaint. When you’re ready to level up, mortise and tenon joints are the gold standard. Mortise and tenon joints offer superior strength, with the tenon sized to two-thirds of the mortise depth and fitted tight enough to require hand pressure to seat.
“A joint that fits like a handshake, snug but not forced, with glue as the true bond, will outlast the furniture around it.”
Joinery choices by skill level:
- Beginner: Pocket holes, brad nails with wood glue, dowel pins
- Intermediate: Dado joints (grooves cut for shelves), rabbet joints (stepped edges for backs)
- Advanced: Mortise and tenon, dovetail, hand-cut bridle joints
The detail that separates average builds from truly durable entryway bench joinery is glue surface area. More contact between two pieces means more holding power. That’s why dado joints grip shelves so well and why mortise and tenon outperforms a simple butt joint every time. For complex builds with heavier components, exploring advanced furniture construction methods before starting saves you from rebuilding later.
Avoiding mistakes: Common pitfalls and troubleshooting tips
Solid joinery is only half the battle. Now, sidestep rookie mistakes. The most experienced woodworkers will tell you that most build failures aren’t about skill. They’re about rushing.
90% of joint failures come from poor layout. Wood movement from moisture changes can ruin a project that looks perfect on day one.
Wood moves. It expands when humid and contracts when dry. Maryland summers are notoriously humid, and that moisture gets into unfinished wood. If you build tight joints without accounting for seasonal movement, you’ll see cracks, warping, and popped joints within a season.
Common mistakes to avoid:
- Skipping the dry-fit: You will find problems. Always find them before glue.
- Improper clamping: Too little pressure leaves gaps. Too much crushes wood fibers and squeezes out all the glue.
- Wrong grain direction: Running grain in opposite directions on glued-up panels causes splits.
- Ignoring wood moisture content: Wood above 12% moisture will shrink after your build is complete.
- Poor squaring habits: A frame that’s even slightly out of square causes every subsequent component to fight you.
- Skipping sanding grits: Jumping from 80-grit to 220-grit leaves visible scratches under finish.
If you want hands-on guidance, Maryland woodworking classes cover joinery fundamentals, green woodworking, and skill-building in a structured setting. Learning in a class environment also means access to better tools and experienced instruction.
For those moments when a project is simply beyond your current skill set, knowing when to ask for help is its own form of wisdom. Resources on when to avoid DIY mistakes can help you make that call without second-guessing yourself.
Why bespoke craftsmanship is worth the extra effort
Having addressed mistakes, let’s take a step back and consider why this craft is so meaningful. After over 20 years of building custom entryway furniture for Maryland families, we’ve noticed something. The homeowners who rush the process almost always come back wanting to redo it. Not because the piece falls apart, but because it never quite feels right.
Speedy builds skip the moments that matter most. The careful dry-fit where you realize the proportions are off. The afternoon spent hand-sanding a surface until it’s smooth enough to feel like something special. Those aren’t wasted hours. They’re the hours that turn a furniture project into something your family talks about.
Learning joinery, attending a class, or simply taking an extra day to plan teaches patience and precision that carries into every project after. Each build makes the next one better. And the piece itself, standing in your entryway every single day, becomes a quiet reminder of what you’re capable of creating. That’s worth far more than a fast build. Focusing on creating truly lasting pieces is the philosophy behind every project we believe in.
Take your furniture projects to the next level
Ready to take your skills further or want professional help? Sometimes a project calls for more than what a weekend and a YouTube tutorial can deliver. Complex built-ins, custom mud lockers with integrated storage, or furniture sized to unusual entryway dimensions often benefit from a professional eye.

At Furniture Design Group, we work alongside Maryland homeowners to design and build exactly what their entryway needs. Whether you want to collaborate on a design you’ve sketched out yourself or hand the project off entirely, our team brings over 20 years of hands-on craftsmanship to the table. Explore our work from local custom furniture experts who understand Maryland homes, or browse our portfolio of custom furniture masterpieces for ideas and inspiration. Reach out today and let’s build something worth coming home to.
Frequently asked questions
What basic tools do I need for step-by-step furniture building?
You’ll need a miter saw, drill, Kreg jig or pocket hole kit, clamps, sander, tape measure, and brad nailer for most entryway builds. Console tables rely on this same basic toolkit, making it a versatile starting set for multiple project types.
How do I make sure my DIY bench or table is square?
Measure diagonals to check for equal length at each assembly stage and clamp frames securely before fastening. Checking for square at every step, not just at the end, ensures your frame stays true throughout the build.
What wood should Maryland homeowners use for entryway furniture?
Oak, pine, and plywood are reliable choices. Prioritize hardwoods like oak for higher durability in high-traffic areas. Local Maryland experts consistently recommend oak for its resistance to denting and its ability to take a beautiful stain finish.
How can I avoid common joinery failures?
Carefully plan your joinery, keep wood moisture below 12%, and ensure tight-fitting joints with proper glue and clamping pressure. 90% of joint failures trace back to poor layout, so invest time in marking and test-fitting before committing to fasteners.